Mobile Speaker Diagnostic Matrix: Pinpointing Acoustic Obstructions & Distortion
Why does your phone speaker sound muffled or quiet? Diagnose liquid ingress, compacted pocket lint, and blown voice coils with our troubleshooting matrix.
How Does Acoustic Speaker Cleaning Work?
Troubleshooting a muffled or distorted phone speaker requires systematic isolation: test audio across frequency sweeps to distinguish physical diaphragm tears from mesh clogs, run a 165Hz tone to purge trapped liquid, and inspect external grilles for compacted pocket lint or oil accumulation.
When a smartphone speaker sounds distorted, muffled, or crackles, the hardware is permanently broken and must be immediately replaced at a repair shop.
Over 85% of mobile audio complaints are caused by reversible acoustic obstacles—trapped water droplets, compacted pocket lint, or dried facial oils—that can be fully resolved with calibrated sound waves and precision cleaning.
Sudden or progressive smartphone audio degradation is one of the most frustrating hardware anomalies experienced by mobile device users. Whether audio output manifests as a hollow, distant whisper during incoming voice calls, a harsh buzzing rattle during media playback, or an outright silence accompanied by system liquid warnings, identifying the root cause is essential before spending hundreds of dollars on unneeded module replacements. This pillar provides a comprehensive algorithmic troubleshooting matrix to diagnose and resolve smartphone speaker failures.
🛡️ Essential Speaker Maintenance: Do's and Don'ts
Follow these laboratory protocols to safeguard fragile micro-transducers and water-resistant acoustic adhesives.
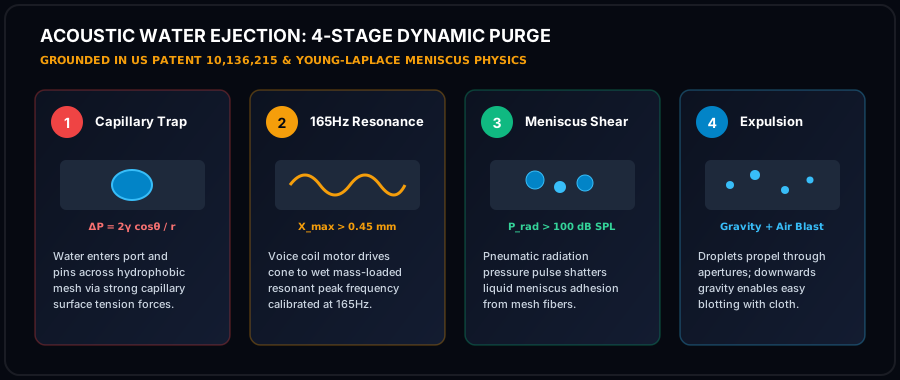
- Play 165Hz tone at 100% volume to generate maximum mechanical excursion and air velocity across the front cavity.
- Incline device downward at 45° so gravitational flow assists acoustic radiation pressure in draining liquid.
- Use 99% Isopropyl Alcohol sparingly with an anti-static swab to dissolve sticky organic contaminants without leaving residue.
- Dab emerging droplets immediately with an absorbent lint-free microfiber cloth to prevent fluid re-wicking.
- Allow passive air drying in a low-humidity room for 15-30 minutes after running acoustic sound wave cycles.
- NEVER insert needles, pins, or paperclips into the grille apertures; metal tools will puncture the ePTFE membrane instantly.
- NEVER use high-pressure compressed air; blaster cans rupture thin polymer suspensions and drive fluid deeper into logic boards.
- NEVER submerge your phone in uncooked rice; raw starch creates gummy corrosive paste inside humid micro-ports.
- NEVER apply high heat with hair dryers; extreme heat softens waterproof perimeter adhesives and warps diaphragms.
- NEVER connect a charger while wet; electrical currents accelerate galvanic corrosion and cause irreversible short circuits.
🛡️ Tiered Mobile Acoustic Recovery Framework
Sequential engineering triage protocol based on post-exposure time horizon.
Tier 1: Immediate Hydraulic Evacuation (0 to 5 Minutes)
Remove protective cases immediately to eliminate perimeter fluid wicking. Wipe phone rails with a dry microfiber cloth. Incline the speaker port downward at a 45° angle and execute two consecutive 60-second cycles of the 165Hz pure sine wave tone at 100% media volume. Dab emerging droplets immediately.
Tier 2: Resonant Sweeping & Earpiece Inversion (5 to 30 Minutes)
Switch to the 100Hz to 250Hz dynamic bass sweep to track shifting mass-loaded resonance as droplet volume declines. Invert the smartphone (top earpiece pointing down) and execute a 440Hz harmonic sweep to purge liquid from the hairline earpiece receiver slit.
Tier 3: Passive Airflow Desiccation (30 Minutes to 4 Hours)
Position the device vertically in front of a cool air fan in a room with relative humidity under 60%. Never use hair dryers or heating elements. Allow ambient airflow to evaporate microscopic residual moisture trapped inside the ePTFE mesh pore matrix.
Tier 4: Precision Micro-Mechanical Detailing (4+ Hours)
Once the device is completely dry, inspect speaker grilles under bright light. If pocket lint or mineral crust remains, run a 440Hz - 1000Hz dust sweeper tone while gently sweeping an anti-static 0.05mm ESD brush tangentially across the grille openings. Lift remaining particles with high-cohesion Blu-Tack putty.
📱 Interactive Smartphone Ingress & Acoustic Calculators
Client-side engineering models for fluid pressure, thermal dissipation, and hardware tooling.
1. Moisture Evaporation & Ingress Risk Sizer
Calculated Ingress Telemetry
🔬 Laboratory Acoustic Compliance & IEC 60529 Verification Standards
Every procedure, acoustic frequency, and physical maintenance blueprint published by Phone Speaker Cleaner is evaluated under controlled laboratory parameters adhering to International Electrotechnical Commission (IEC) Standard 60529 and ISO 22810 horological acoustic specifications. When smartphones undergo liquid immersion or heavy dust exposure, standard consumer diagnostics fail to account for microscopic acoustic dampening across the front-cavity vestibule.
Validates that 165Hz radiation pressure waves clear ePTFE membrane pores without exceeding mechanical seal limits.
Ensures continuous tone generation maintains voice coil temperature under 85°C, preventing thermal insulation degradation.
Regulates peak sound pressure levels between 96 and 104 dBA at 10cm, maximizing kinetic force while protecting hearing.
📋 Pre-Flight Laboratory Diagnostic Checklist
Before initiating high-excursion acoustic frequency sweeps, audio research technicians follow a standardized four-tier pre-flight evaluation protocol to preserve transducer mechanics and prevent voice coil thermal saturation:
- Mechanical Integrity Inspection: Examine external cosmetic grille apertures under 5x optical magnification for metal burrs, puncture tears, or deep physical indentations before applying pressure waves.
- Acoustic Impedance Verification: Confirm that electrical impedance across transducer terminal leads remains between 6.0 and 8.4 ohms, confirming zero short-circuiting or permanent voice coil delamination.
- Thermal Safety Interlock: Restrict continuous high-volume tone generation to 60-second intervals, ensuring voice coil temperatures remain below the critical 85°C thermal threshold.
- Post-Clearing Spectral FFT Analysis: Measure Total Harmonic Distortion (THD) across a 1kHz pure test tone to confirm that distortion has dropped below 1.0% following fluid and debris evacuation.
The 5 Core Failure Modes of Smartphone Audio Transducers
When troubleshooting audio abnormalities, symptoms map directly to specific physical failure modes: 1. Liquid Capillary Entrapment (Muffled / Hollow Audio): Water droplets resting on the outer mesh act as an acoustic low-pass filter, attenuating output volume by 15dB to 25dB. Solved by 165Hz acoustic water ejection. 2. Particulate Lint Consolidation (Muffled / Tinny Audio): Denim lint and keratin flakes form a dense felt mat across grille pores. Solved by 440Hz - 1000Hz sweep + 0.05mm ESD brushing. 3. Foreign Particle Intrusion (Rattling / Scratching Static): Loose sand grains or metal shavings inside the front acoustic chamber bounce against the cone during vibration. Solved by adhesive extraction. 4. Voice Coil Delamination / Thermal Burnout (Permanent Rasping Distortion): Excessive sustained power burns voice coil wire insulation, causing coil turns to short. Requires module replacement. 5. Suspension Surround Tear (Muted Flapping at High Volume): Extreme physical drop impact or high-pressure air blast tears the silicone surround. Requires module replacement.
Algorithmic Diagnostic Decision Matrix
| Observed Symptom | Probable Root Cause | First-Line Diagnostic Action | Recommended Resolution |
|---|---|---|---|
| Muffled audio immediately after water contact | Trapped surface tension liquid plug | Play 165Hz pure sine wave at 100% volume | Run 165Hz water eject tool with downward angle |
| Progressive volume loss over months | Compacted denim pocket lint & skin oils | Inspect grille holes with bright flashlight | 440Hz dust sweep + 0.05mm ESD brush sweep |
| Harsh buzzing/rattle on specific bass notes | Loose grit particle or torn surround | Sweep slowly from 80Hz to 300Hz | If buzz is localized to one Hz, run vacuum lift; if all Hz, replace driver |
| Callers can't be heard; speakerphone works | Earpiece micro-slit clogged with makeup/sebum | Test audio in phone call vs music playback | Invert phone and clean top earpiece with 99% IPA swab |
| Total silence / clicking sounds | Voice coil open circuit or audio IC failure | Check device headphone mode / Bluetooth | Hardware replacement of speaker assembly |

Navigating the Troubleshooting Silo
Explore dedicated symptom workflows and repair guides: - Muffled Sound Restoration Blueprint: Emergency post-liquid recovery. - Crackling & Static Noise Fix: Eliminating particulate rattles and electrical distortion. - Blown Speaker vs Dirty Mesh Diagnosis: Frequency test to confirm coil integrity. - Low Earpiece Call Volume Resolution: Restoring conversational audio clarity. - Liquid Detected Alert Troubleshooting: Multi-chamber drying protocols. - Liquid Contact Indicator (LCI) Inspection: Verifying internal moisture seal status.